
Drive digital transformation with the Planview Adoption Framework
Drawing on our direct experience implementing our solutions for customers in a variety of markets and industries, we designed the Planview Adoption Framework: a series of self-guided customer journeys aligned to each of Planview’s solutions.
Our flexible framework enables leaders to understand which capabilities can be leveraged to achieve their desired business outcomes, no matter what stage of transformation their organization is in. Each capability includes key resources, such as best practices and detailed business processes, to help prepare your teams and get the most value from the Planview platform.
Watch platform demoView solutionsExplore capabilities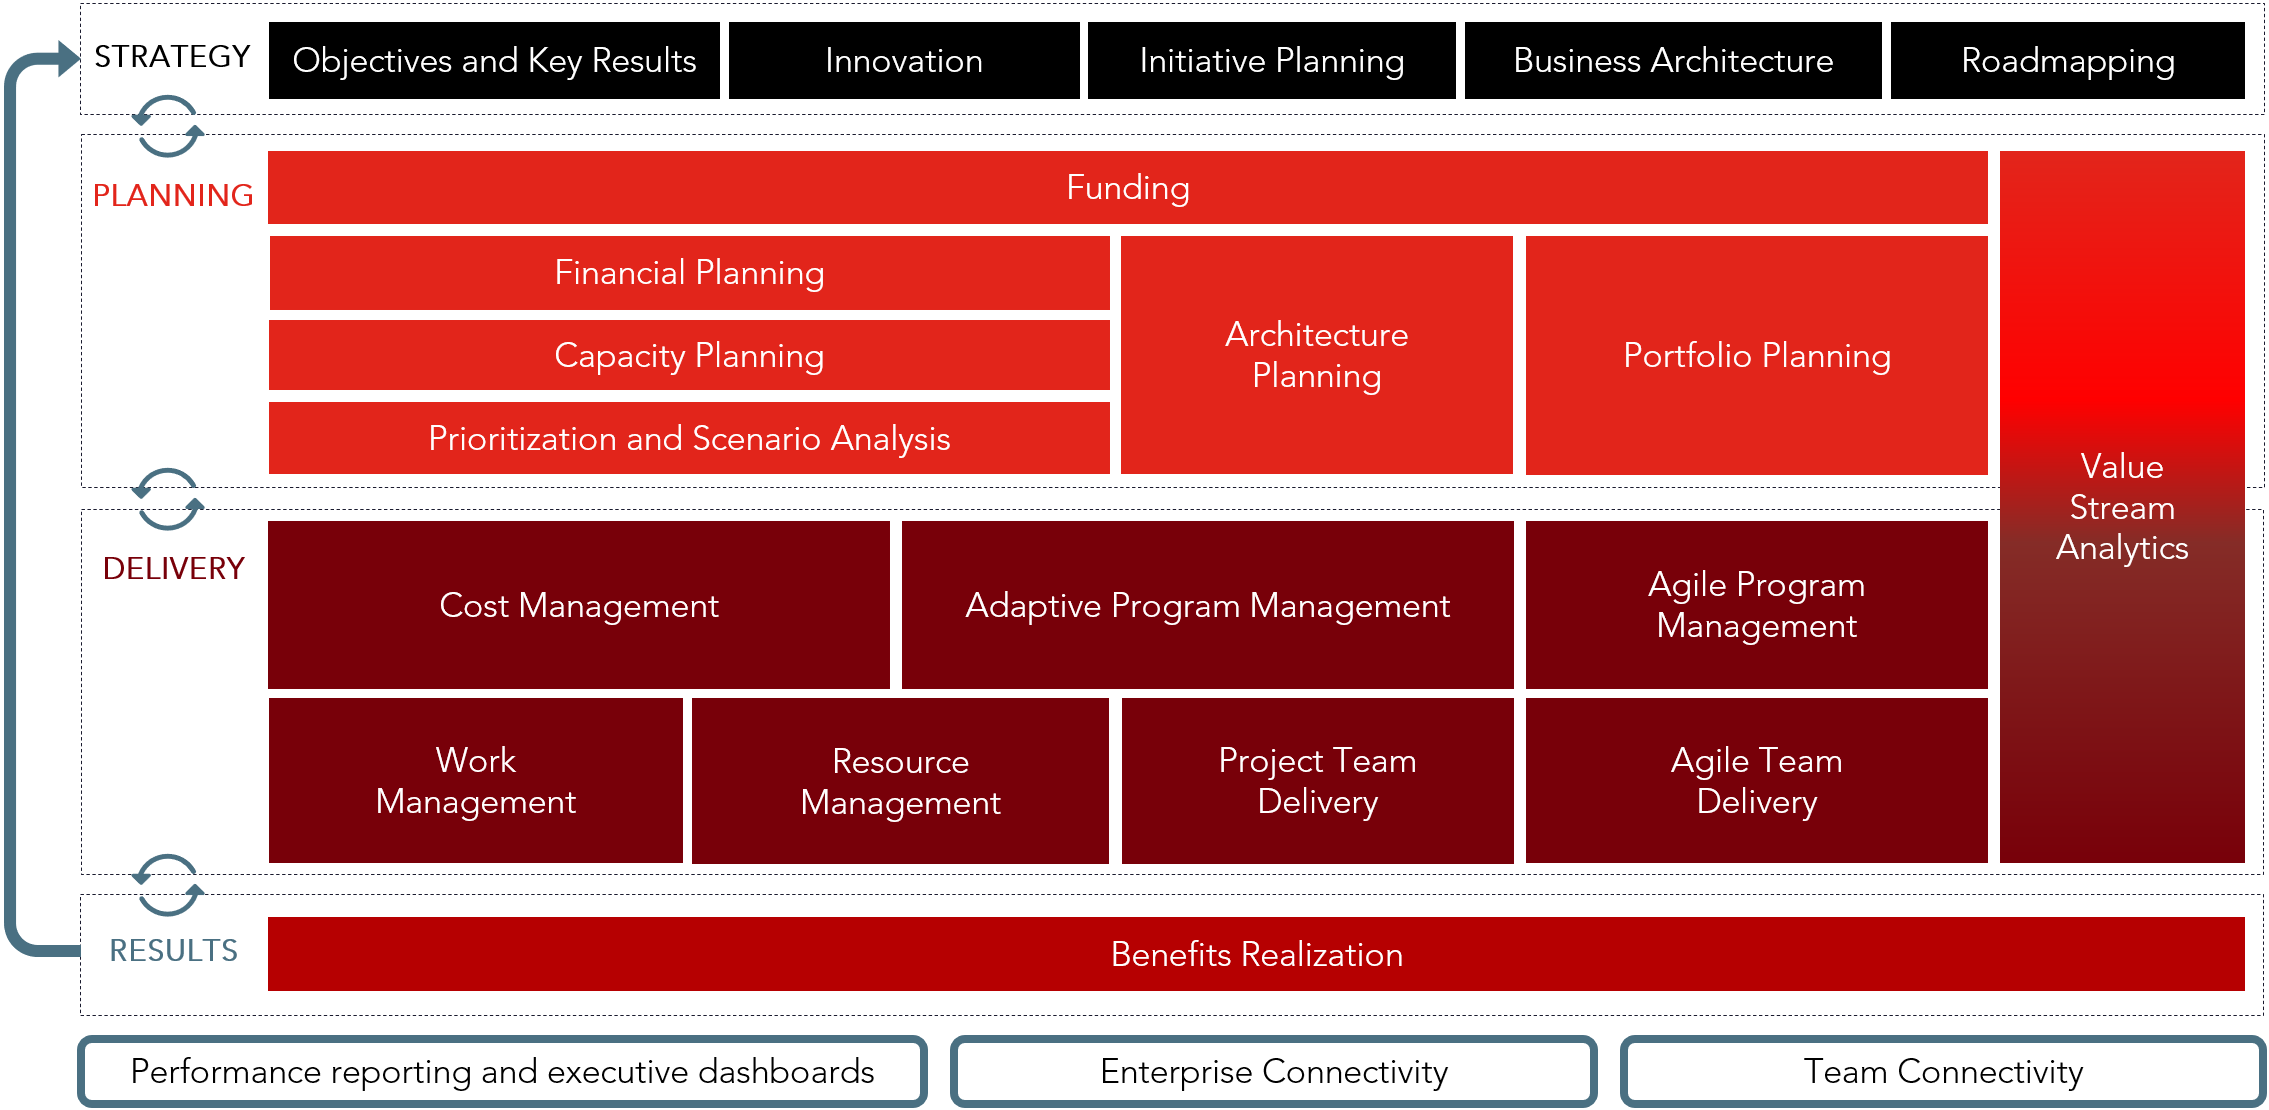


Featured Event
Planview Accelerate global virtual conference
Join the largest gathering of Planview customers, industry leaders, and experts to network virtually and level up your skills! Gain actionable information you can use immediately, in day-to-day activities and future planning – reinforcing the benefits of your investment and partnership with Planview.
Planview announces two big innovations at Accelerate
Planview Copilot is a generative AI assistant you can use to converse and question your enterprise data using natural language. It is now easier than ever before to glean insights, derive recommendations, and facilitate work-oriented actions.
Planview.Me is a new actionable and personalized user experience. With Planview.Me, you can customize your Planview experience to highlight the data and details you need to get work done.
Want to know more about how Planview is using AI to build the future of connected work? Check out these exciting programs for Planview Copilot and Planview.Me below.
 Webinar
AI strategy and Planview Copilot webinar
Learn to leverage AI-powered insights, hear about Planview’s vision for the future of AI, and get a demo of Copilot, Planview’s generative AI assistant.
Register now Inner Circle
Planview Copilot Inner Circle
Contribute your insights and shape the future of Copilot, and get a front-row seat to explore Planview’s AI capabilities firsthand.
Register now- Inner Circle
Planview.Me Inner Circle
Share your input and shape how the Planview.Me connected platform experience grows over time, and get more information about initial functionality.
Register now  Program
Generative AI Early Access program
Contact your CSM, AE, or Flow Advisor to discuss qualification, availability, and pricing. Currently available to Planview Viz customers, with support for other Planview products coming soon.
New and trending
- Video
Planview platform executive overview
Learn how the Planview platform for connected work is your key to successful digital transformation.
Learn more  Report
Turning strategy into reality
Uncover the actions you need to take with a new study by Economist Impact, commissioned by Planview.
Learn more Product release
Connected OKRs
Leverage the connected OKR framework to gain alignment and visibility of objectives in Planview Portfolios and Planview Agileplace.
Learn more
Success stories
 Case study
Canadian Tire
With access to accurate, up-to-date information, Canadian Tire uses Planview Portfolios to select investments that will have the most significant impact on the business, in context with the overall portfolio.
Learn more Case study
Huntington National Bank
Shifting to a product-and-value stream-centric model powered by Planview’s Enterprise Agile Planning solution, Huntington Bank learned how to measure the true value of its efforts and investments and enable alignment of all activities to enterprise goals.
Learn more Case study
Accenture
With Planview® Tasktop Hub, the ALIP business unit optimizes efficiency and bolsters customer satisfaction during initial development, testing phases, and throughout the long-term client relationship.
Learn more